
If you do not have Photoshop you can use Splashup, a free online photo editor that has layer capability! I noticed that you can’t “paste” a photo onto a layer in this program, so just open the photo you want to use as your first layer and go from there!
ONE:
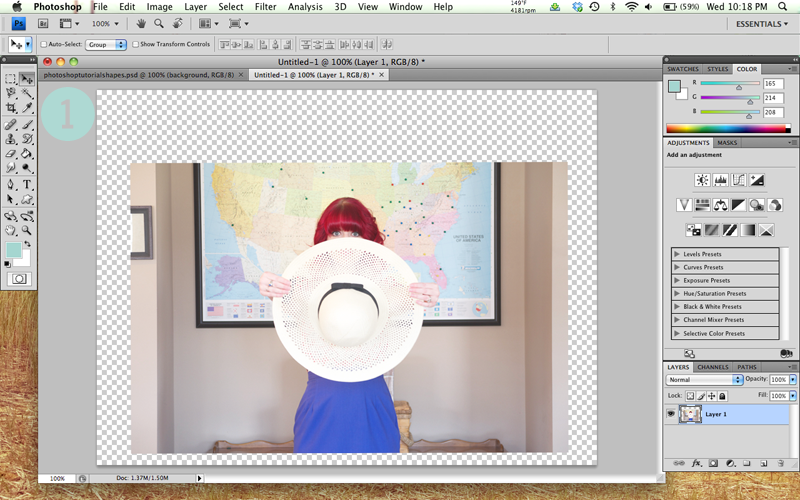
Open a new brand new blank image (File/New), select the width and height you wish to use (I chose 800×600), and make sure that the background is set to transparent. Open the photo that you want to use in another window, resize it as needed, copy and paste it on to your transparent background. You can see above that my photo has been resized to a smaller width (700px) than my transparent background (800px). I did this so that more of the image could fit inside of my circle, since I chose to make it a bit smaller.
TWO:
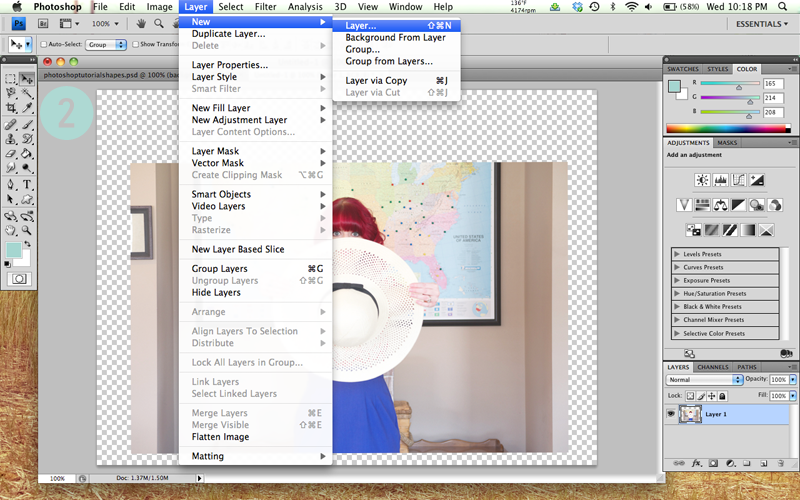
Next, you will need to create a new layer. Make sure that your new layer is listed above your first layer in the list to the right. Now select the paint can from the menu on the left and choose your background color. I chose white because my website has a white background. We could actually make this image transparent but sometimes the illusion is easier! I’m a lazy photoshop user. ;] Fill this new layer with the color you’ve selected. Your first layer will now be covered up – it should now look like the image in Step 3!
THREE:
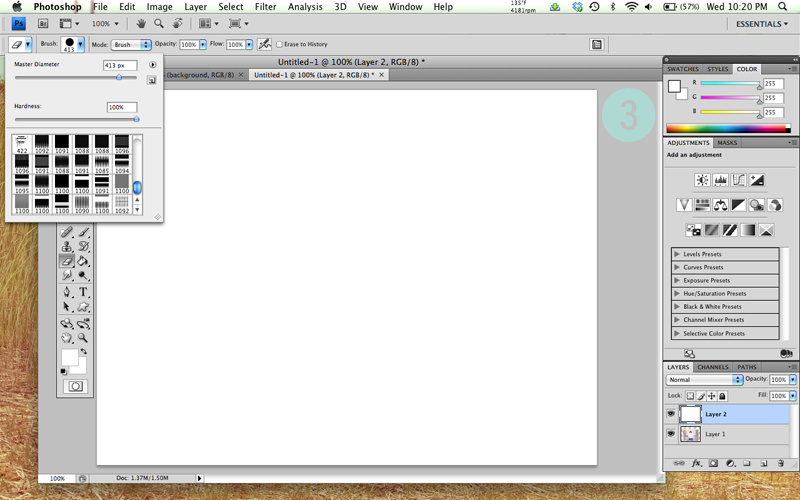
Now you will need to select your Eraser tool. At the top left you can choose which brush you would like to use to Erase with. Choose the largest circle (my screen shot shows different brushes in the box, but you can see that I have the circle selected). Above the brushes you will see the Master Diameter slide bar- this is where you will select how large or small you want your circle to be – I chose a circle around 413px so that I could decorate around my image but you could choose to make it as wide and tall as the image you selected.
FOUR:
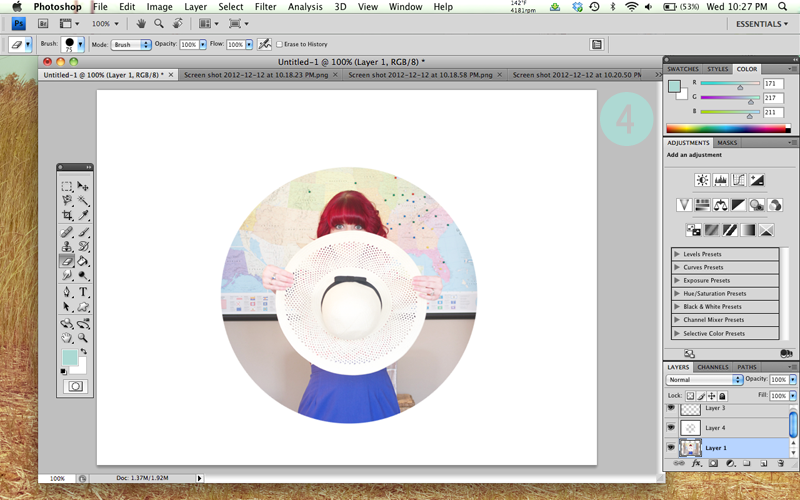
Now take your eraser brush and click once in the middle to “cut out” a hole so that the layer behind it can be seen! If the image isn’t placed exactly how you want it inside your circle simply select first layer from your layers list on the right, select the Move Tool (top right arrow in your menu on the left) and drag it around to the desired place! If your image is barely too small or barely too large for the circle you can resize it a bit by selecting the Marquee Tool (to the left of the Move tool), right click on your your chosen photo, choose “Free Transform”, and you will be able to adjust it! Sometimes this can distort a photo though if you’re making a smaller image larger- so be careful with that! A Resizing Tip: hold down the shift key while you drag the corners to resize your photo – it will retain the original shape of the photo!
And that concludes this easy-peasy tutorial! To use this “frame” again, simply save your file as a .psd file and replace the photo in your first layer with another. Feel free to download the file I created and use it if you wish! If you have any questions please feel free to shoot me an email or tweet! I don’t claim to be a Photoshop expert and I’m new at creating tutorials so if something is unclear I am happy to help!
 Click Here To Download
In The Making Of This Tutorial:
Font // Found Here
Tape Strips // Found Here
Brushes // Found Here + Here


Great blog! I just discovered it!
-Sabrina http://thelittleowlshop.blogspot.com
I don’t even know how I ended up here, but I thought this post was great.
I do not know who you are but certainly you’re going to
a famous blogger if you are not already 😉 Cheers!
Here is my weblog: goji slim
This site was… how do I say it? Relevant!!
Finally I’ve found something that helped me. Thank you!
สวัสดี ฉันเชื่อ นี้เป็นใหญ่ เว็บไซต์ ฉัน stumbledupon มัน ;
) ฉัน จะ กลับ อีกครั้ง
ตั้งแต่ ที่ฉันได้ หนังสือ ทำเครื่องหมาย
มัน เงินและ เสรีภาพ ที่ดีที่สุดคือ เป็น ที่ยิ่งใหญ่ที่สุด
วิธีที่จะ เปลี่ยน คุณอาจจะ อุดมไปด้วย และยังคง ช่วยเหลือ
อื่น ๆ .
Take a look at my weblog agent gclub
Greetings from Carolina! I’m bored to tears
at work so I decided to check out your blog on my iphone during
lunch break. I really like the knowledge you present here and
can’t wait to take a look when I get home.
I’m surprised at how fast your blog loaded on my phone ..
I’m not even using WIFI, just 3G .. Anyways, great blog!
reusable bags here
Anything light will do just to keep your mind off the things that
stresses you. While you are trying to prevent hair loss, be gentle with
your hair. It can also help reduce skin aging and protect the skin against
the damage caused from stresses and toxins.
My blog; Home Remedies For Hair growth
I am curious to find out what blog system you’re using?
I’m having some minor security problems with
my latest website and I’d like to find something more risk-free.
Do you have any suggestions? how to get revines and likes on vine
I take pleasure in, result in I found exactly what I was
taking a look for. You have ended my four day long hunt!
God Bless you man. Have a great day. Bye
Hi there, You’ve done a fantastic job. I’ll certainly digg it and personally recommend to my friends.
I am sure they’ll be benefited from this web site.
my web blog: rayban
Your work most appreciated. It will help the Photoshop folks.
out of all the junk out there, finally a good tutorial
Flavorful data locales where you ought to get hold of photoshop aides. Specialists for photoshop programming is going to direct you and you simply must consider it important. In the meantime we will have interactive media library where you ought to discover data, system session and some more.
Flavorful data locales where you ought to get hold of photoshop aides. Specialists for photoshop programming is going to direct you and you simply must consider it important. Dissertation Services In the meantime we will have interactive media library where you ought to discover data, system session and some more.